
The power of the Knight increases.
As we have seen in the general lesson about forks any piece can create a fork. The Knight fork however is the most common reason for losing material. The unusual way the Knight moves means that knight forks are often overlooked.
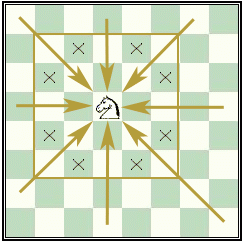 | The figure on the left is another way to show the moves of the Knight. The Knight can move to all the squares within the indicated area that can not be reached by a Queen from the position of the Knight. Within this area the Knight and the Queen are complementary pieces. But this also means that if a Knight is attacking a piece, not being a knight, this piece is always unable to capture the Knight. | |
 | In the next figure the Knight is able to check the King on e7 and f6. This means that Black’s Queen can’t be placed on all the indicated squares, because it can immediately be captured or the resulting Knight fork will assure that Black loses his Queen. The same is true for a Rook or an unprotected Bishop. It is very clear that the influence of the Knight isn’t limited to the original 8 squares. But if Black places the Queen on a square like a6 or c2 the number of unsave squares for the Rooks is increased again. |
Do you remember all the targets?
Then try to find the Knight fork in the following diagram.
 | You will probably find the Knight fork 1.Nd7 almost immediately, but that is not the right solution, because we can find a much better Knight fork. You can make the solution visible by selecting the text between the two square brackets. [ 1.Ng4 attacks the Queen but also threatens the mate in one 2.Nh6. Therefor Black has to defend against the mate 1...h5 after which White can capture the Queen 2.Nxf2 ] |
Post a Comment