
As I have mentioned in the lesson about taking free pieces almost all chess games are won by first obtaining a material advantage.
I have added some capture exercises to this site. They are intended for the beginning chess player, but it is assumed that this chess player knows how the pieces move and also knows about the value of these pieces.
Refresh the page to get the next random exercise.
The exercises can be seen as a follow-up on this last one and the lesson about taking free pieces.

Knowing all the rules, moves and starting position isn’t enough to become a good chess player. More chess lessons will follow, but this may be a good moment to emphasize that you also have to move this theory into practice. Nobody can learn to play chess without playing chess games.
Here are some tips especially targeted at junior players.
Most of these tips are based on the fact that in almost all beginner’s games one of the players is able to win pieces because they weren’t protected.
Think before you move and make sure that you don’t leave a piece unprotected, because
- you place the piece on an unprotected attacked square
- or because the piece was protecting another piece that becomes unprotected
Furthermore if a piece is touched you have to move this piece, but you may decide to place it on another square (than originally intended) as long as the piece has not been released.
Think before moving: Is this realy the best move or is it possible to capture an unprotected piece of the opponent?
If you are about to capture a piece: realize that chess isn’t about capturing pieces. Is it possible to capture a more valuable piece or is it possible to checkmate?
You have to be aware of the value of the pieces in order to be able to determine if an exchange is profitable.
If you manage to reach a simple endgame that is known as won, you have to be able to finish it off. You have to be able to win a game with a King and Rook against a bare King, and certainly with a King and Queen against this bare King. Practice this with a friend or with a computer.
In order to make it easier to understand the concepts of chess it is advised to learn the Algebraic chess notation.
You will find a new mate in one problem each time you visit this page (or after a refresh of this page). After giving the right solution or after three wrong answers the solution is revealed.
You can make a move by clicking on a piece and dropping it at the target square.
The white (or black) circle indicates that it's white's (or black's) turn to move. All diagrams are mate in one puzzles. Some are easy and some are a little bit difficult. Or do you prefer the mate in two problems or the mate in three problems?
 | This lesson describes a rather easy method to perform a checkmate with a single Rook. The black King is in the centre of the board and White must force him to the side of the board. This will be done by cutting off some of the King’s escape squares with the Rook. Since the black King is on the right side the rook starts from the left side by 1.Rd1 (Continue at Diagram 2) | |
 | Black tries to keep his King in the centre but White is also moving the King to the centre. 1…Ke4 2.Kc3 The white King will always go for the line just outside the Rook’s rectangle. The black King can not play 2…Ke3 because of 3.Re1. He has to avoid the opposition. | |
 | 2…Ke5 3.Kc4 Ke6 4.Kc5 Ke7 5.Kc6 Ke8 6.Kc7 In fact 6.Rd7 is better, but in this lesson one line at the time is taken away from the black King. Now the black King has reached the end of the board. He has to move to the right or in opposition with the white King. 6…Ke7 7.Re1+ (Diagram 3) And now the black King has to move to the right. 7… Kf6 8.Kd6 Kf5 9.Re8 Kf4 | |
| The Rook likes to be on a rank that is nearer to his own King. This makes it easier to follow the black King. | ||
 | And now to take away the next line: 9…Kf4 10.Kd5 Kf3 11.Kd4 Kf2 12.Kd3 Kf1 13.Kd2 Kf2 Rf8+ (Diagram 4) 14…Kg3 15.Ke3 Kg4 Again moving the Rook to the other side: 16.Rf1 Kg3 Not Black’s best move, but let’s see what happens if Black tries to capture the white Rook. |
17.Rg1+ Kh2
Nothing happens. White just has to move the Rook to the other side.
18.Rg8 Kh1 19.Kf2 Kh2 20.Rh8# 1-0
Now black’s King has no lines left at all.
This is a rather easy way to accomplish the checkmate, but it takes some time. On the other hand it certainly takes less than 50 moves.
Have you already learned the checkmating with the Queen or do you prefer to start with the first lesson at intermediate level: Piece activity?
You have to know some of the checkmates in order to know what you are looking for when playing a chess game. Some of these basic checkmates even have a name. By studying this kind of diagrams you may be able to avoid or to make use of similar positions during your own games.
King and Queen checkmates

King and Rook checkmates

Back rank checkmate
 | Many beginners often oversee this kind of Mate. You have to pay attention to this kind of mate opportunities when you run into this kind of positions. To prevent being mated like this it may be a good idea to have an escape square for the king. |
Scholar’s mate
 | Scholar’s Mate is the most common opening trap a beginner falls into. In this checkmate both the Bishop and Queen attack the weak f7 pawn. This pawn is weak because, in the starting position, it is only protected by the King |
Epaulette mate
 | In the epaulette mate the King is on its back rank and the Rooks of its own color on either side are blocking off the king’s escape route. But for the mating pattern it doens’t matter if other pieces then Rooks are involved, as long as they are of the same color. |
Have you already seen the chess lesson about Checkmating with the Queen?
The best way to improve your chess game is to start improving your tactical skills and to learn the principles of endgame and opening play. Despite of the fact that most beginners start by studying opening moves this hardly contributes to a better understanding of the game.
Understanding a chess opening means that you are able to make use of the fact that the other player plays a rather strange move. After memorizing some chess openings you are only able to do the right move as long as the other player follows the well-known opening lines.
Furthermore the goal of the chess game is to mate the opposite king, which is one of the reasons that we have to start at the end. It is also easier to comprehend the collaboration of the few pieces that are left in the endgame and it turns out that as soon as you understand these endgames you will know what to do in the middle game in order to reach a favorable endgame.
This is one of the reasons why studying endgames is so useful.
On the other hand we have to know the chess rules.
You may want to continue by learning:
- some basic checkmates
- how to checkmate with the queen?
- how to checkmate with the rook?
or do you want to do some mate in one exercises?
If the player whose turn it is has no legal moves the game has to end. If this player is not in check it is called stalemate. Stalemate ends the game and the result is a draw, even when one of the players has a big material advantage.
The following two diagrams are stalemates.

So you have to be very careful and avoid the stalemates especially when you are a Queen ahead. The next two diagrams do not represent stalemates.
Do you see why?

The black King has no legal moves, but black still has legal moves. He has to move his pawn. After the pawn move it is white’s turn. And both diagrams result in a mate in one problem.
Can you solve it?
For the first diagram there are four solutions and the fact that black’s pawn may have been promoted to a Queen (or another piece) doesn’t matter.
The next lesson tries to explain why chess lessons start at the end.
In the previous lessons we have learned how to attack and defend pieces. But the other player will also defend the pieces you are attacking. If an exchange doesn’t give you any advantage you may be able to attack the piece once more.
As an example in the diagram on the left white is able to capture the Knight, but then in turn black will capture the Bishop. Therefore it may be better for white to move the Rook to a5, attacking the Knight by two pieces at the same time. In the diagram at the right white can capture the Knight with the Bishop and black will not capture the Bishop.
Why shouldn’t white capture the Knight with the Rook?

Let’s have a look what happens (in the second diagram) if black captures the Bishop that has captured the Knight. These moves result in the following diagram.

White will capture the undefended Rook, as you have learned in the take free pieces lesson.
You can see that white has won a Rook and a Knight and black only a Bishop. If black hadn’t recaptured the Bishop the loss would be limited to the Knight.
It is very important to consider the value of the pieces before you start an exchange. And remember that your opponent isn’t obliged to capture, which makes it very important to capture with the attacking (and defending) pieces in the right order.

The final diagram is an endgame of a King with a single Rook against a bare King. This is rather easy to win as we will see in the lesson dedicated to this endgame.
Now that you know how to move the pieces and to capture the free pieces your opponent is offering it is time to spend some time on a lesson about how to deal with an attacked piece.
If one of your pieces is attacked you have to know how the piece can be defended. There are at least 4 possible ways to escape capture:
- Capture (the attacking piece)
- Evade (Move away the attacked piece)
- Defend (If your opponent captures the piece you can recapture his piece)
- Block (Place another piece or pawn between the two pieces)
Capture
In both of the diagrams below the black Bishop on d6 is attacking the white Bishop on b4 and in both cases white is able to capture the black Bishop, but in the second diagram black is able to recapture white’s Bishop with his Rook. In fact this second diagram is a rather complex situation in which white has a lot of possibilities to escape capture.

Evade
It is also possible to evade the pieces which is probably the best thing to do in the next two diagrams.

Defend
The following diagrams are used to illustrate the possibility to defend a piece. In the first diagram the attacked black Bishop can be defended by moving the Rook to a7. In the second diagram the white Bishop can be defended by moving the Knight to f1. It is important to know the value of the pieces when you defend or exchange pieces.

Block
The fourth possibility to defend a piece is by placing another piece or pawn between the attacker and the attacked piece. In the first diagram the black Queen is attacked and it is not allowed to move the Queen on another file, because the King will be in check. It is possible to defend the Queen by moving the King to b7, but this will result in an exchange of the Queen for a Rook. The best move is placing the Bishop from e8 to b5.
In the second diagram the Queen is attacked by the Bishop on g5. In this diagram more blocking opportunities exist, but the most often played move is Be7.

More ways to defend
There are more ways to defend a piece against being captured, but these will be part of future lessons. To give you one clue: by looking at the second diagram in the capture section, you may notice that moving the Rook to d1 is probably a better move.
After this lesson on defending we are going to attack twice as hard with the lesson on the twofold attack.
It is essential for chess players to know the relative value of the chess pieces in order to judge a trade of pieces.
The most commonly used values are:
- 1 : Pawn
- 3 : Knight
- 3 : Bishop
- 5 : Rook
- 9 : Queen
In addition the Bishop is more powerful than the Knight, especially in conjunction with the other Bishop.
Trading pieces based on these values without thinking about the final result may lead to the following position (in which it is Black’s turn to move).

In almost all chess games one of the players wins by first obtaining a material advantage. The easiest way to obtain such a material advantage is to take the free pieces offered by the other player.
One way to localize these pieces is to look at each of your own pieces to see whether one of them can take the piece that just moved. Another way to localize these pieces is by starting from this piece itself and look on the same line or file for rooks and queens, on the same diagonals for Bishops, etcetera.
Not all potential free pieces are to be found this way, but it is a good start for a beginning chess player. For a more experienced player it is also needed to look at the opponent’s pieces that were defended by the moved piece at its previous position.
Later on it will become more important to assure that the found potential free pieces are really free.
Some exercises

 | The Queen is a very powerful piece, but even this powerful white piece is not able to checkmate the black king by itself. The white king is needed to support the queen. This kind of endgame is very common when a player has managed to promote a pawn. Attention has to be paid to avoid a stalemate and the mate must be reached within 50 moves as it is a draw if 50 consecutive moves occur without a capture or pawn move. | |
 | Theoretically the maximum number of moves that is needed to checkmate is 10 which corresponds to the position of the upper board on the left side. First the black king is imprisoned as shown in the second diagram by 1.Qe5 Then the king has to come to assist the queen: 1…Kd3 2.Kg7 Kc4 3.Kf6 Kd3 4.Kf5 Kc4 5.Ke4 Kb3 | |
 | And the prison is made smaller: 6.Qc5 Ka4 If Black plays 6…Kb2 the reply is 7.Kd3. A smaller prison by 7.Qb6 and again the white king has to approach: …Ka3 8.Kd3 Ka2 9.Kc3 Ka3 | |
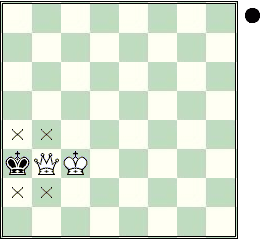 | After 9…Ka1 white mates with 10.Qb2#
but now it is: 10.Qb3# It is a good exercise trying to visualize all the checkmating patterns with the queen and king. |
Are you already able to checkmate with the rook?
According to Wikipedia scholar's mate is the checkmate which occurs after the moves 1.e4 e5 2.Qh5 Nc6 3.Bc4 Nf6 4.Qxf7#. The moves may be played in a different order or with slight variations, but the basic idea – the queen and bishop combining in an attack on f7.
Just let's have a look at some of these variations and how we can avoid this mate.
OK, now that we have seen these variations of the Scholar's Mate and some of the rather easy defences try to avoid these traps as much as possible in the future.
The Fried Liver Attack is far more interesting opening to play.
Fool's mate is the quickest possible checkmate. It only takes two moves, and it can only be accomplished if White is really helping to get mated.
There are eight possible variations that lead to the mating pattern, but they are all very similar. You can replay all of them below.
The game below is used to show the Short Algebraic Notation in combination with the Chess Notation symbols. The game in itself may be illustrative, but the main goal is an exercise with this notation. Do you know al the symbols used?
In practice the long algebraic notation is only used by players learning the game. Most of the time chess players use the short algebraic notation.
This is almost the same notation, but with the starting position and the hyphen left out.
But now some moves have to be disambiguated. If two (or more) identical pieces can move to the same square, the letter indicating the piece is followed by (in descending order of preference):
- the file of departure if they differ
- the rank of departure if the files are the same but the ranks differ
- both the file and rank if neither alone uniquely defines the piece
1.f3 e5 2.g4 Qh4# 0-1
In the previous post we have seen how each square of the chess board can be identified by a letter and a number. In chess notation we also identify the pieces. Apart from the pawns each type of piece is identified by an upper-case letter. Most of the time this is the first letter of the name of the piece which makes this notation language dependant, but English-speaking players use K for king, Q for queen, R for rook, B for bishop, and N for knight (since K is already used).
Now the moves can be notated by the letter of the moving piece followed by both the starting and ending position separated by a hyphen. When the piece makes a capture, an x is used instead of the hyphen.
Castling is indicated by the special notations O-O for king-side castling and O-O-O for queen-side castling. A pawn promotion is followed by a letter to indicate the chosen piece.
If a move places the opponent’s king in check the notation “+” is added. Checkmate is indicated by a “#”. At the end of the game the game result is added (1-0, 0-1 or ½-½).
As an example of this long algebraic notation the moves of Fool’s Mate can be notated as:
1. f2-f3 e7-e5
2. g2-g4 Qd8-h4# 0-1
Now continue by learning the Short algebraic notation.
Before we are going to learn the algebraic chess notation we have to identify each square of the chessboard with a unique coordinate. The files are labelled with the lower-case letters a through h, from the left of the player with the white pieces. In addition the ranks are numbered from 1 to 8. The result is that each square of the board is uniquely identified by its file letter and rank number, as shown for some example squares in the diagram below.
Beginner's Chess Lessons
Published on Thursday, October 22, 2009 in Beginner, Overview | reactions (0)
This post gives an overview of all the Chess Lessons currently on this site that are intended for the beginning players.
Learning the moves and the rules
- The starting position
- The Rook
- The Bishop
- The Queen
- The King
- The Knight
- The Pawn
- En passant
- Castling
- The end of the game
Learning the Chess Notation
- The squares of the chess board
- Long algebraic notation
- Short algebraic notation
- Chess Notation Symbols
- An illustrative example game
Improving your play
- Some tips
- Think before you Touch
- An illustrative example game
- Take free pieces
- The value of the pieces
- Capture exercises
- Defending
- Twofold attack
- Stalemate
- Chess lessons start at the end
- Basic checkmates
- Scholar's Mate
- Fool's Mates
- Mating with the Queen
- Mating with the Rook
- An illustrative example game
- A typical beginner's game
- Mate in one exercises
A typical beginner's game
Published on Saturday, October 10, 2009 in Beginner, Intermediate | reactions (0)
The following game is a very illustrative game between two junior players, Jennifer and Johanna, with an ELO rating of about 900. They know how to play and they are not really beginners, but make some mistakes that are rather typical for intermediate players. Let's have a look!
Subscribe to:
Posts (Atom)